How (and Why) to Get Started with Google Cloud Print

Wouldn’t it be wonderful if you could print from any of your devices (desktops, phones, tablets) to any of your printers, at any time? Read on as we explore Google Cloud Print, a fantastic way to enable printing on all your devices big and small.
Why Do I Want to Do This?
The best workflow and computer tweaks make your life easier, and that’s certainly true of setting up Google Cloud Print. Once you have learned about the system and configured it, you’ll be able to print to all your devices without a bunch of annoying go-between steps.
In other words, there will be no more “OK, I looking at this file on my Android phone, so I’ll save it to my phone, copy it to my Dropbox account, go over to the computer and get it from Dropbox, and then send it to my home printer.” There will be only “OK, I’ll print this.” and the Cloud Print system will delivery it right from your phone (wherever you are in the world) to the printer you’ve selected.
Easy printing from a desktop computer has long been a cinch; Google Cloud Print brings that same ease of one-click printing to everything else in your stable of electronic gadgets.
What Do I Need?
To use Google Cloud Print you need three primary things:
- A Google Account.
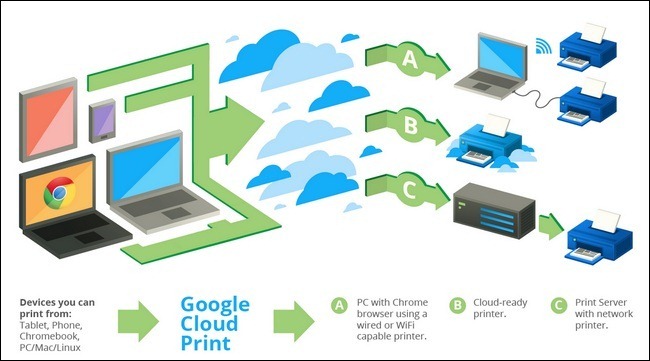
- A Cloud Print-enabled printer or computer capable of running Chrome connected to the printer.
- A device capable of printing to Cloud Print (e.g. an Android phone, iOS device, laptop, or tablet).
The glue that binds everything together is your Google Account and the Cloud Print servers. What is bound together depends on your personal setup. If you have a newer Cloud Print-enabled printer (check the list here) you won’t need a computer to act as a print server.
If you don’t have a Cloud Print-enabled printer, you’ll need a computer that is on and connected to your printer during the times you want to print (if you have an always on home-server, now would be an idea time to configure it to print to your home printer so you can use it instead of your desktop).
The final component is the device you wish to configure to print to your Cloud Printer. This device (or devices) will most likely be mobile because, after all, your permanently located devices like home office computers and such are likely already configured to print to your home computer via traditional methods.
How Do I Configure My Printers?
The first order of business is getting the actual physical printer online and part of your Cloud Print network.
If you have a Cloud Print-enabled printer, the best way to configure it is to refer to the manual–look for a Getting Started with Cloud Print section or the like. Setup should be as simple as plugging in a few items in the configuration panel of your printer.
If you don’t have a Cloud Print-enabled printer, there are a few extra (although trivial) steps to complete. In order to complete them, you will need to be on a computer that is 1) on when you want to print 2) has Google Chrome installed and 3) can print to the printer you wish to print to remotely.
Note: Before we proceed, we highly recommend going into the Devices and Printers menu on your machine and removing any old printers.

We, for example, had several phantom printers installed that were no longer in service in our home office. If you don’t remove them, they’ll end up being listed in your Google Cloud Print account as useless clutter.
First, you need to enable Google Cloud Print in your installation of Google Chrome. This will allow Chrome to act as a print server for the Cloud Print service and send documents to the printers accessible to the computer on which it is enabled. 
Click on the Menu button in the upper right hand corner of the Chrome interface and select Settings. Within the Settings menu scroll down to the bottom and click on “Show Advanced Options”. When the advanced options are displayed, scroll down until you see “Google Cloud Print”.
If you are not signed into your Google Account within Chrome, the button will say “Sign in to Google Cloud Print”. If you are already signed in (e.g. you’ve enabled syncing for this installation of Chrome), the button will read “Add printers”. Sign in if necessary and then click “Add printers”; in addition, take a moment to ensure that “Continue running background apps…” under the System section is checked to ensure your Cloud Printer server stays active even when you’re not actively using Chrome.
After you hit “Add printers”, you will be presented with a confirmation screen that indicates you don’t actually have to do this step to use the Cloud Printer service. That’s true, you could use Cloud Printer strictly to print PDF files to your Google Account–that’s an awesome feature, but it’s not our goal today. Our goal is to get physical printouts from our printer.
Go ahead and click the blue “Add printer(s)” button to continue. This step automatically adds all the printers available on your computer to your Google Cloud Print account. It’s important to only do this on one computer that can access your printers–otherwise you’ll end up with a mess of duplicate printers listed in your account.
Once you have added all your printers you can view/manage them by visiting this link:

There are two things worth noting in the screenshot above. First, the “Share” button and second, the “Owned by me” flags beside all the printers we just added into the system. Cloud Print makes it as easy to share printers with people as it is to share documents in Google Docs. Rather than set up some sort of complex networking arrangement, you can simply give your friend’s Google Cloud Print account permission to use your printer. Printers people share with you will appear here but will be flagged “Owned by [Friend’s Name Here]”.
How Do I Print to My Cloud Printers?
Now that your printers are Cloud-enabled, we have to attend to the most important business of all: getting documents from your devices to your printers.
If you’re printing from a Google App of any sort, life couldn’t be easier. Whether you’re using the Google Drive app on Android, or Gmail on iOS, or just logged into the web interface for Google Docs from a remote computer, you can print directly from Google Apps into the Google Cloud Printer service. For example, here are some screen shots of me sending my daughter’s chore check list from Google Drive, via my Android phone, to the printer upstairs–no special add on software or tweaks required:

All I had to do was open the document, click the menu in the upper right corner, select “Print”, select the printer, and then review the print options before clicking “Print”. By the time I walked up the stairs to retrieve the printout, it was already sitting in the tray.
When you’re not printing directly from a Google App or an instance of Google Chrome with account syncing turned on, you’ll need a helper application of some sort. There are helper applications available for Android, iOS, Windows, and OS X that extend the print functionality beyond Chrome/Google Apps to any print-capable application on the system (or serve as a sort of mobile print platform where you can open documents from your device and send them to the Cloud Printer).
You can check out the list of apps in the Google Cloud Print Supported Apps section and grab the appropriate app for your system. If you’re curious how these apps work, you can check out our tutorial demonstrating how to use the third party Cloud Print app on Android here. Update: There is now an official Google Cloud Print application for Android.
Once you’ve completed the simple configuration process, the potential of the Cloud Print system is vast. You can share a printer with a friend or colleague who routinely needs to send you physical documents, you can set up a shared photo printer at your parents’ house so you and your siblings can automatically send photos of the grandchildren, and, at minimum, you’ll never have to dink around with trying to get a file off your mobile device and onto your remote printer again.


